Step by Step introduction to LEAP™5
This is presented as a 'worked example' starting from the home page of a LEAP installed site or LEAP demo site. For a more detailed description you can use the Documentation Menu in the right side panel at any time.
Type the access word L3AP on your keyboard to leap into the site.*
Enter your username, and password:
1. Understanding Spaces and Scopes.
Click the Leaping Frog button in the LEAP toolbar - this switches on, or off, the Lenses.
LEAP Spaces are highlighted by Lenses on the page with different coloured highlights that are pre-set in LEAP™5.* Note there are:
- yellow highlight box shows over the main menu - the Menu is a content space
- a green highlight box over the central text area - this is a content space
- another green highlight box over the right side column - this is a content space
- no highlight boxes over the images or blank spaces that are embedded in the design of the skin - showing that these are not editable content spaces
Green highlighting shows the PAGE level spaces. Content entered in the Green highlighted boxes only appears on this page.
Yellow highlighting shows the SKIN level spaces. Content entered in the Yellow highlighted box appears on every page that uses the same Skin. For example Menus are defaulted to Skin (eg Home, About, Services etc) and will appear on every page that has the same Skin specified. This is called the SCOPE of a Space.
Red highlighting shows SITE level spaces.
More about Scope
The SCOPE defines just how far that content space will exist through the site (almost like a tracing paper, or ‘bleed through’ concept).
There are typically two levels of Scope available in a LEAP™5 Lite version: Skin, and Page, and up to the full six levels in the Premium and Enterprise version.
Click the Leaping Frog button again, and the Lenses turn off.
TIP! you need to turn the lenses off to be able to use the menu on the website page.
2. Adding a Page
Use the LEAP toolbar menu - Site, and select from it Add Page.
- It will ask for the page name - this is the information that goes in the header of the browser window.
- Click suggest and see the URL's that are offered.
- If none of the ones suggested are perfect, you can edit into it, then click the tickbox to select the one you want (this is useful if you already know what the URL should be as you have already created the menu item reference to it!).
- Make sure to have the skin highlighted - the text beneath the skin changes colour to show which is the selected skin.
- You can choose to add default keywords and descriptions, or just click save!
TIP! Really important step - When the page is ready for the world to see, don't forget to go to Site / Page Manager / List Page and set it to "Active" - only then will external users see your new page.
3. Adding General Content
Use the LEAP toolbar menu - Add Content, and select the type of content you want to add - for this example use TEXT.
You will see all the potential places that a Text content space can be added.
- activate the placement you want by clicking into the text box. This places the box and opens the standard Text editor tool frame with default text inserted “insert content here”
- delete the default text, and enter your own content - for a learning exercise, you can copy and paste the example below - then click save.
Of Foxes and Dogs.
The quick brown fox jumped over the lazy dog. It was a spotted dog, a Dalmation I suppose - not that Dalmations are usually lazy - that would have to be a Golden Labrador!
4. Understanding the source view
Make sure you have the LEAP Lenses on highlighting the content spaces - if not, just click the Leaping Frog again to bring the Lenses back.
- click into the Text space that was just added - only this time use the “go-large” icon to view the full editing palette
- click on the very top left icon “Source” 
This shows you all of the ‘print formatting’ that was pasted in with the text - this view is useful if you need to work out if some part is not displaying correctly due to hidden formatting (this issue is common to all content management systems)
- click the ‘source’ icon a second time to return to the ‘what-you-see-is-what-you-get’ (WYSIWYG) view
- REALLY important step: Select all the text and click the Eraser icon from the menu palette, - it will say ‘Remove Format’ when you hover over it and when you have clicked this, the ‘print formatting’ will be removed
What is left when you view the Source again are web-safe specifiers including H2, H3 (for header styles), and spans < > which allow specific text to hold a specific format when all else above, below, or beside it, is in a different format.
TIP! use the 'paste from Word' icon in the centre top of the toolbar if doing a large amount of pasting in from word.
For this interactive learning exercise we will continue to work on the text that you just inserted in section 2 above. Make sure you have the LEAP Lenses on highlighting the content spaces - if not, just click the Leaping Frog again to bring the Lenses back.
- click into the Text space with the content that you just added - only this time use the  “go-large”
 icon to view the full editing palette.
TIP! if you want to increase the size of the large editing window, just drag the bottom right corner to expand.
5. Applying a Style
Now to apply a specific style to format part of our title:
- select the word Foxes from the title 'Of Foxes and Dogs' that is in the copy you inserted during section 2 above
- look in the Styles drop down menu - the first item on the bottom row of the Editing tools palette
- you will see h2 as the current block style - scroll down into the “inline styles” and select a style, for example, BLUE. 
The window you are in will show a preview
- click save
- click the Leaping Frog to close the Lenses
Refresh/reload the webpage to see the style BLUE applied to the word Foxes.
To change or edit text using a pre-specified style
- click the Leaping Frog to open the Lenses
- click into the full edit mode using the go-large icon 
- highlight the text you want to change
- click the Eraser icon to Remove Format
- then, after you have removed the format, select your new chosen format, eg Orange,
- click save, click the frog, and reload the page.
TIP! if you have trouble erasing the format, it is due to the selected content having more than one style applied - to remove them sequentially place your cursor anywhere in the offending content, then click at the bottom of the edit window where it will show " body p span " for example - this is the style cascade. Click the last element 'span' and this will show ALL of the content that is using this style, then click the eraser icon and bingo, the style is all erased!
6. Adding an Image in your Content
Adding an image from the File Manager folder
- click the Leaping Frog to open the Lenses
- click into the full edit mode using the go-large icon 
- place the cursor where you want to insert the image
- from the Editing tools palette select the icon with the picture - called “image” on hover over
- this opens the File Manager
- choose an image from the Current Folder list on the left by clicking on it
- select the image to load into your content area by clicking the Select box  underneath the preview.
Arranging your Image
- adjust the size of the image by entering the pixel height and width inside the Image window
- add space around the image (very important if the image is to have text floating around it) by adding pixel values for the HSpace (horizontal) and VSpace (vertical) - usually around 10 pixels is a good starting point
- add a simple border by entering a number of pixels for the border - usually just 1 or 2 pixels is sufficient for small-medium website images.
- try aligning your image to the left, or right, and see that any text you enter around it will adjust to the placement of the image.
- if you do not use left or right align, you will need to place any text above or below using simple returns to adjust the gap.
Adding images to the File Manager folder
From within the File Manager window:
- use the Choose file button at the centre top of the window - this will open a browser view of your local files and you can browse to a new image and click on it to select
- then, click Upload and the file will be added to your Current Folder on the left, ready to be Selected for use on your website.
7. Other elements
Horizontal Line breaks
Simple elements like a horizontal line break, or styled section break can improve both interest and readability for pages with a lot of information on them, or where really different ideas are being presented on the same page.
The horizontal line break can be inserted from the Editing palette, and the Horizontal Line icon  is found three to the right of the Image picture icon.
Tables
For entering product lists, colour or size options, pricing, or other charts, and simple table can be added by using the Table option, the icon  for which is found two to the right of the Image picture icon in the Editing palette.
8. Configuring to add a Menu item (for more on this see the Adding Menu, and Configuring Menu Items)
In the LEAP™ Menu Manager from the list of existing menus, select the Menu to Configure and open using the green Configure icon.
Note: If setting up for the first time, you will need to Add a menu first.
You will see the Menu items and their position - primary, secondary, tertiary or more, indicated by the number on the left hand side, and by indenting where the menu item is a child of the item above.
- Add a new Menu item by clicking the Add 

- add a new sub-menu by clicking the +Child

When you add a sub-menu you can see it directly under the Name field showing the position that this new menu item will be.
- specify the Link for your Menu to match to the Page already created - or yet to be created - for that Menu items content
- if your menu item is a link to another website, you can tick the ‘Open in new window’ so that you do not lose your website visitors into another website
- select Go Live as Instant, or, on a given date
- specify if the page is to Expire
* the access word, and the highlight colours of the lenses are configurable.
Adding a Page - introduction
From the Site Menu, select Add Page.
This opens a window where you need to:
- Give the page a general title
- Click suggest to get the 'web-safe' URL option for that name, OR, type or edit your own URL with no spaces or strange characters!
- Select the skin
- Specify a page group (if any)
- Specify page keywords (if any)
- Click save
- if you want the page live immediately - don't forget to go to Page Manager, List Pages and click the 'live' button!
- if you don't set it live, only a LEAPed in user will see the Page you just created (which is great if it's not finished)
- if you don't set it live, only a LEAPed in user will see the Page you just created (which is great if it's not finished)
For more detail on how to add a page see the Site Menu section.
TIP! you can edit into the suggested URL to create a shorter URL. Do this with care that you do not add unsafe characters like 'apostrohpe's' and ' space in your URL '
Adding Text and Image Content
Adding text and images is done by using the Add Content menu. From Add Content, select the type of content you wish to add.
You will then see Insert Boxes, showing all the places that you can add your piece of content - either above or below any existing content, and only in the Spaces that have been designed into the Skin that your page is configured with.
- Click the Leaping frog icon to turn the Lenses on, then,
- Click into the body of the highlighted Lens to open a Basic editing window, OR,
- Click the 'go-large' edit icon to open a larger edit window with a greater selection of insert, import and edit tools
TIP! Take great care when selecting a content insertion area - a common mistake is to pick one that has a Site level scope, instead of Page level. This shows by your new page content appearing on your Home Page! Copy your content and Delete this content element, then insert a new element in the Page level and paste your content.
Using the large edit window, you have many standard editing tools to use. 
Top left is the Source button - this toggles to show you the code version of the content you can see in the editing window.
The bottom left is the Style selector, that will reference any styles coded in as part of the skin you have uploaded
Next to the Style selector is the standard format selector, font selector, size, colour, and highlighting selector. These give you the ability to modify the styles where the pre-set styles do not include what you want.
The most important icon is the blue Eraser for "remove format". This icon may appear in different places, depeding on the size, and version, of your edit window. This helps you remove excess formatting that comes in with pasted text (unless you use the 'paste from word' or 'paste as plain text' options icons - also in the top row toward the left).
The second most useful thing you can do for your website after having meaningful content (information and images) is to have that information actively linked to let the read follow a thread of interest.
Add links to your text by selecting the text you want to link from, then click the chainlink icon (in the screenshot above it has the world behind it, but in other screens it may be a chain icon on it's own).
Once the link tool has been selected, you will have the fields presented for 'destination' which is the page you will send the viewer to on click. If it is a page on the same site you are on, you only need to add the url from the first '/' onwards.
If the destination is on another website you need the full url from http:// onwards. When sending viewers off your website, always be sure to set the Target tab to 'New Window' so that your website remains open without viewers needing to browse back to it.
Adding new content areas and placing menus - introduction
Menus
Menu placement in LEAP™5 is treated just like any other type of content with one exception: by default a Menu has a Site-Level-Scope that makes it visible throughout the site.
A Menu in this context is a piece of content to be placed - it is a list of items and links to other parts of your site.
To create a Menu structure that gives the item and page links inside the Menu content area, refer to the section called Menu Manager. The Menu Manager also shows how to hide Menu items until you are ready to display them - useful for working on, and previewing content before letting the world see.
To add a Menu to a page, from the LEAP™ Toolbar, select the module - Menu - from the "Content" drop-down list. The Lenses will turn off, and instead clickable objects (shaded boxes) will appear in each position where it is possible to add that Menu element - typically giving options of above and below all other items on the page.
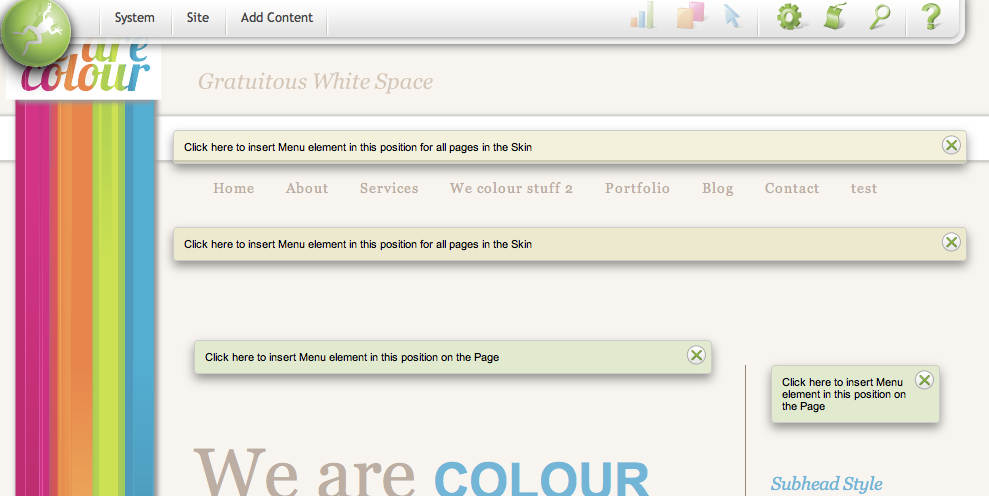
- activate a Menu where you want to place it - just click into the body of the object and an instance of that module to be inserted in that place while other object options close
- clear these clickable objects without inserting any just by clicking the "X" in the panel of any one object and all the object placement options close.
Note: the coloured lenses indicate the different Scopes so that you can pick the correct insertion place to show on a Skin, or, to just show on a Page. Other Scope levels are discussed in Scope, Spaces and Lenses.
TIP! You usually want a Menu in a Site, Skin, or Page Group level scope. You usually want content in a Page, or Page Group level scope and NOT in a Site level.
Text
To add a Text Content area on a page, use the same steps as above, just select Text instead of Menu from the LEAP Content drop down menu.
![]()
When adding in Text from a document into a content area created, use one of the Paste In options from the go-large editing toolset. The options are "paste as plain text" and "paste from Word". These help you bring clean un-styled text onto your page that can then have web-safe styles appied to, and links added to the text so that is displays the page the way you want it to.