Creating a content plugin: step-by-step
These instructions refer to any new LEAP™ 5 content plugin as "helloworld". Wherever you see helloworld in the instructions or code, insert your own plugin name. There are four main steps.
- Create the basic file structure
- Create your version file
- Create the code skeleton of your plugin
- Import and activate your plugin
1. Create the basic file structure
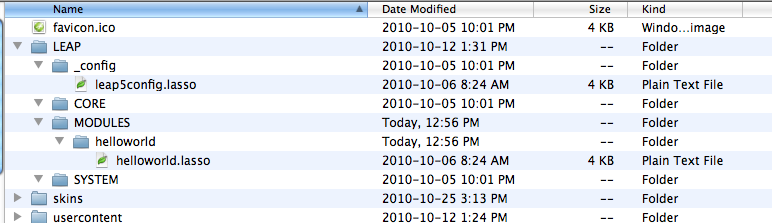
Create a folder in the /LEAP/MODULES/ directory of your LEAP installation.
With your text editor of choice, create a .lasso file of the same name in the surface of this new directory.
TIP!: pay attention to case sensitivity - some Linux / Unix systems your plugin may be deployed on have case-sensitive file systems.
Your file structure should now look similar to this:
2. Create your "version" file
The role of the version file is to instruct LEAP™ 5 what your initial settings are when first loaded, and at a later date when a user is updating from a supplied distribution of your plugin.
The version.lasso file lives inside the surface of your new plugin directory.
The version.lasso file has the following contents. Customize this to the appropriate information for your new plugin.
<?LassoScript
	// ==================================
	/*
		Delivers version information and any other pertinent info we would like to share
	*/
	// ==================================
	var(moduleConfig = map(
		'name' 			= 'Hello World',
		'parentModule'	= '',
		'description'		= 'A demo Content Plugin.',
		'iconClass'		= 'hello',
		'version'			= 1,
		'leapVersion'		= 5,
		'menu'			= 'content',
		)
	)
?>- The "name" is what will appear in the "Add Content" menu of the LEAP™5 toolbar.
- "description" is a brief description outlining what your plugin does.
- "iconClass" refers to the css class of the menu icon. The naming convention and sample CSS is explained here in detail.
- "version" is an integer that applies to your plugin's version. Increment this according to your release process. This will be viewed in the update procedure to determine if an update is required from the central repository or not.
- "leapVersion" should remain static at 5 until further notice.
- For a content plugin, "menu" should be defined as "content".
3. Create the code skeleton of your content plugin
A LEAP™ 5 content plugin can be easily broken down into a few sections.
- Setup
- Handlers
- Display
- Admin
In your newly created helloworld.lasso file, enter the following:
protect => {
	handle_error => {
		$gv_debug_status ? log_critical('helloworld module error: '+error_currenterror)
	}

	/* =========================
		Setup
	========================= */
	var(Feature_Map = map)
	LEAP_manageFeatures->populate
	local(featurelist = map(
			'aVar'		= 'yes'
		)
	)

	with i in #featurelist->keys do => {
		$Feature_Map->find(#i)->isA('void') ?
			LEAP_manageFeatures->update(#i,#featurelist->find(#i))
	}

	/* =========================
		Handlers
	========================= */
	if($actionis == 'save' && $gv_admin) => {
		if($ContentID > 0) => {
			LEAP_Audit->page(-contentid=$ContentID)
			with i in #featurelist->keys do => {
				LEAP_manageFeatures->update(#i,string(client_param('LEAP_'+#i))->trim &)
			}
			LEAP_manageFeatures->populate
		}
		$gv_admin = false

	else($actionis == 'cancel')
		$gv_admin = false
	}

	/* =========================
		Display
	========================= */
	if(!$gv_admin) => {^

		'Hello world, today\'s date is: ' + date
		'<br />aVar is currently: ' + $Feature_Map->find('aVar')


	/* =========================
		Admin
	========================= */
	else
		'Admin goes here!'
	^}
}
The admin section is covered in more detail here.
4. Importing and activating your plugin
Now you are ready to let LEAP™ 5 know about your new content plugin!
From the LEAP™ 5 "System" Menu, select System Settings > Content Plugins.
There you will see all the existing LEAP™ 5 content plugins available to your users. To import your new plugin follow these steps:
- Click the "Add plugin" button
- Since your new plugin is uncompiled, it should appear in the "Plugin Path" dropdown list.
- Select this item ("helloworld" in our example)
- Click "Save"
- You are presented with a view of the settings as read by LEAP™ in your version.lasso
- Edit and save if necessary.
Once your content plugin has been imported, you will need to refresh the page (or visit a new one) for it to show in the "Add Content" menu.
Select it from this menu and insert an instance as normal.